Table of Contents
ToggleIntroduction
Adding your website to Google Search Console is a crucial step in improving its visibility and performance on Google’s search engine. The Google Search Console provides valuable insights and tools to help you monitor and optimize your website’s presence in search results. In this beginner-friendly guide, we’ll go through the process of adding a website to Google Search Console and submitting a website’s sitemap to Google Search Console.
What is Google Search Console?
Google Search Console is a free web service provided by Google that allows website owners and webmasters to monitor, maintain, and optimize their website’s presence in Google search results. It provides valuable insights, tools, and reports to help website owners understand how their site is performing in search and make data-driven decisions to improve its visibility and performance.
It helps website owners monitor how Google indexes their site, identify issues that might affect its visibility in search results, and offers suggestions on how to resolve any problems that prevent proper crawling and indexing.
Adding your website to the Google Search Console is one of the ways you can improve SEO on your WordPress website.
Benefits of Adding Your Website to Google Search Console
Adding your website to Google Search Console offers several benefits that can help improve your website’s visibility, performance, and overall success. Here are some compelling reasons to add your website to Google Search Console:
1. Website Indexing: By adding your website to Google Search Console, you ensure that Google knows about your site and its pages. Google’s search engine constantly crawls the web to discover and index new content.
By adding your site, you help Google understand your website’s structure and content, increasing the chances of your pages being indexed and displayed in search results.
2. Search Performance Insights: Google Search Console provides valuable data about how your website performs in Google search results. You can access reports that show the keywords and queries users are using to find your site, as well as metrics like impressions, clicks, and average position.
This information helps you understand which pages and queries drive traffic to your site, allowing you to optimize your content and improve your visibility in search results.
3. Indexing Issues and Errors: Google Search Console alerts you to any indexing issues or errors that may affect your website’s visibility in search results. It notifies you if Google encounters difficulties crawling certain pages, encounters errors, or finds problems with your website’s structure.
Identifying and resolving these issues ensures that your pages are properly indexed and improves your website’s overall performance in search.
4. Submitting Sitemaps: With Google Search Console, you can submit your website’s sitemap. A sitemap is a file that lists all the pages on your site and provides additional information about their content and organization.
Submitting a sitemap helps search engines understand the structure and hierarchy of your website, improving the crawling and indexing process. It ensures that search engines are aware of all the pages on your site, including new or updated content.
5. Mobile Usability and Performance: Mobile-friendliness is crucial in today’s digital landscape. Google Search Console provides insights into your website’s mobile usability, highlighting any issues that may affect the user experience on mobile devices.
It helps you identify and resolve mobile-specific problems, ensuring your website delivers a seamless and optimized experience across different devices.
6. Manual Actions and Security Alerts: Google Search Console notifies you if your website has received a manual action or if there are any security issues detected. Manual actions occur when Google penalizes your website for violating its quality guidelines.
By being aware of manual actions, you can take the necessary steps to rectify the issues and have the penalties removed. Additionally, security alerts help you identify and address potential security breaches or malware infections, ensuring the safety and trustworthiness of your website.
How to Add Your WordPress Website to Google Search Console
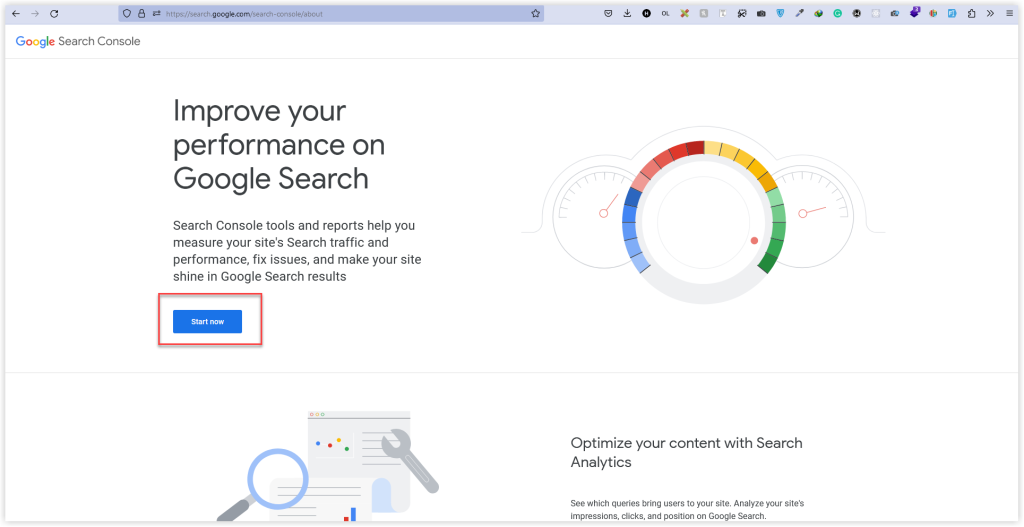
1. The first step to adding your WordPress website to Google Search Console is to visit the Google Search Console website. You should see a page like the one in the image below. Click the “Start now” button to continue the process.
2. If you aren’t signed into your Google account, you will be prompted to do so. You can sign into your Google account or create a new one.
Once you log in successfully, you will be faced with a dashboard similar to the one in the image below
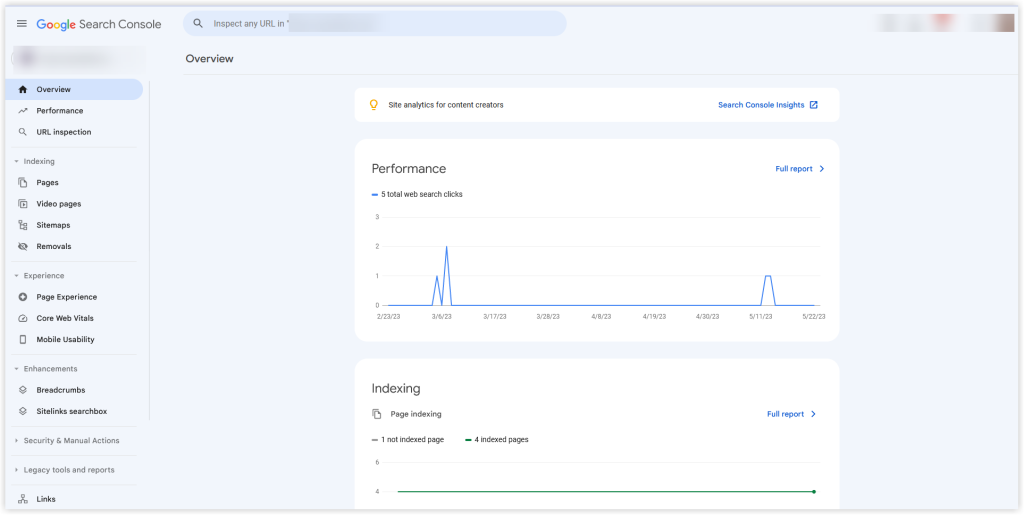
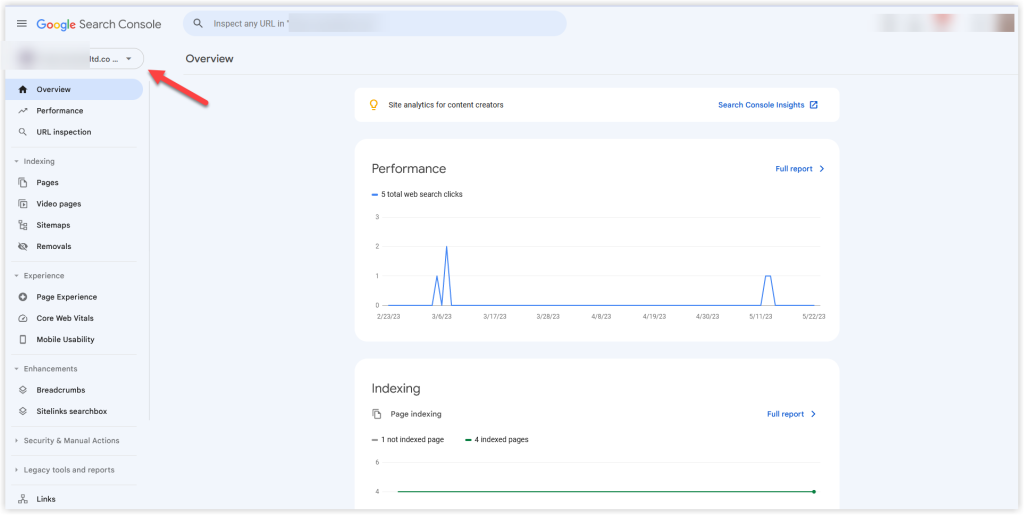
3. Websites are called “Properties” on Google Search Console. To add a new property, click on the dropdown as shown in the image below and click on “Add Property”.
4. Google requires some verification before you can successfully add a site to the search console. This is to ensure that you have ownership rights over the website. After clicking “Add property”, you will see a popup like the one in the image below. Google provides two property types which are “Domain” and “URL prefix”. You can select the URL prefix as it provides many ways to verify ownership of your website, then enter your domain name and click the continue button.
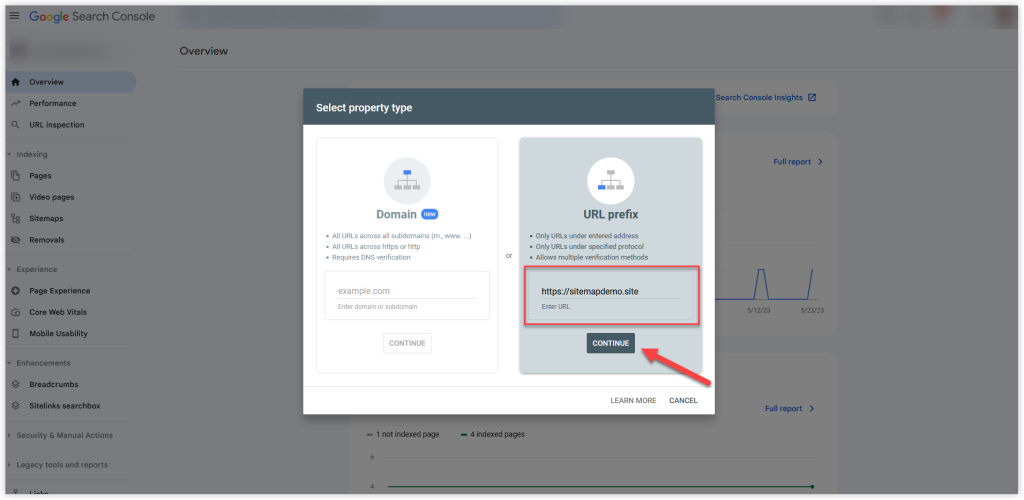
It is important to state at this point that while entering your domain name, you need to also include the protocol, that is, “HTTP” or “HTTPS”. This is because Google deems both protocols to be different and therefore https://wplearnonline.com is different from https://wplearnonline.com.
To be sure of which protocol to use, you can head over to your WordPress dashboard, click on “Settings” and then click on “General”. You will see your correct site URL just as shown in the image below
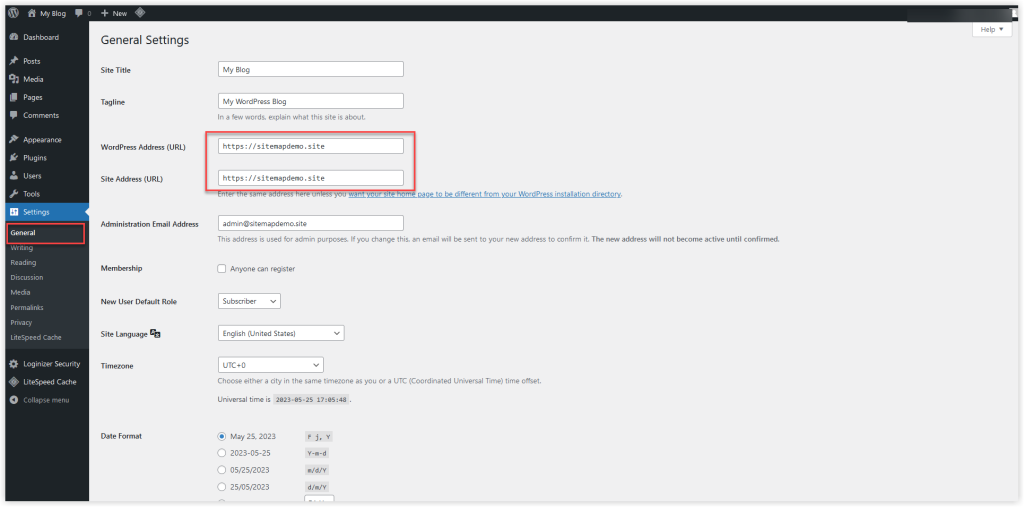
Once you’re sure of the protocol to use, input it into the appropriate field and click on continue.
5. Clicking on the Continue button should reveal another popup with different options to verify ownership of your website. You have various methods such as HTML file upload, HTML tag, Google Analytics, Google Tag Manager and also creating a DNS record (TXT).
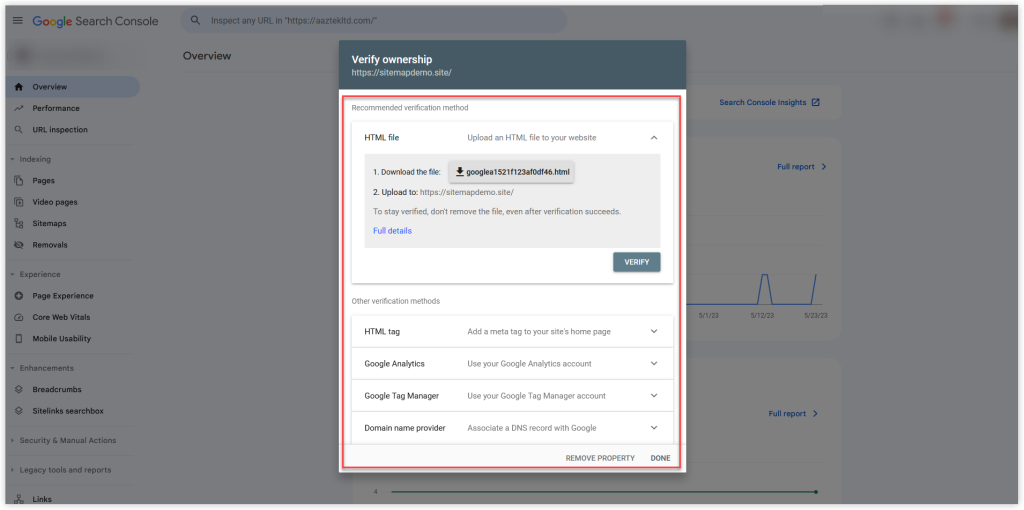
We will be verifying our site using the HTML file upload method
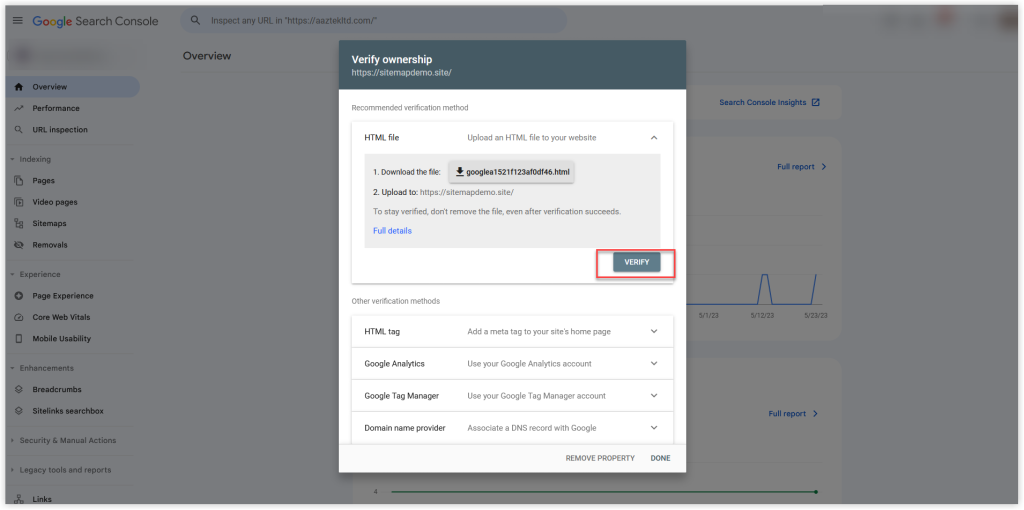
6. To use the HTML file upload method, you need to download the HTML file and then upload it into the folder of your website. For this, you will need CPANEL access ( or something similar depending on your hosting provider).
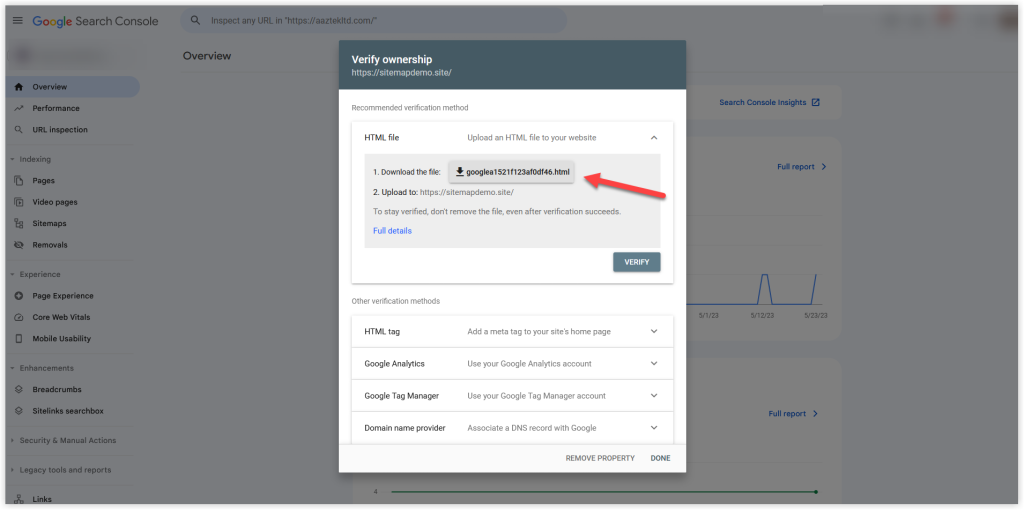
7. Once the file has been downloaded, head over to your website’s file manager, and locate the folder for your website. In most cases, if your website is the primary domain, you can look for a folder named “public html”. If however your website is an addon domain or subdomain, you should look for a folder with the name of your website. Once you locate the folder, open it and then click on “Upload” as shown in the image below.
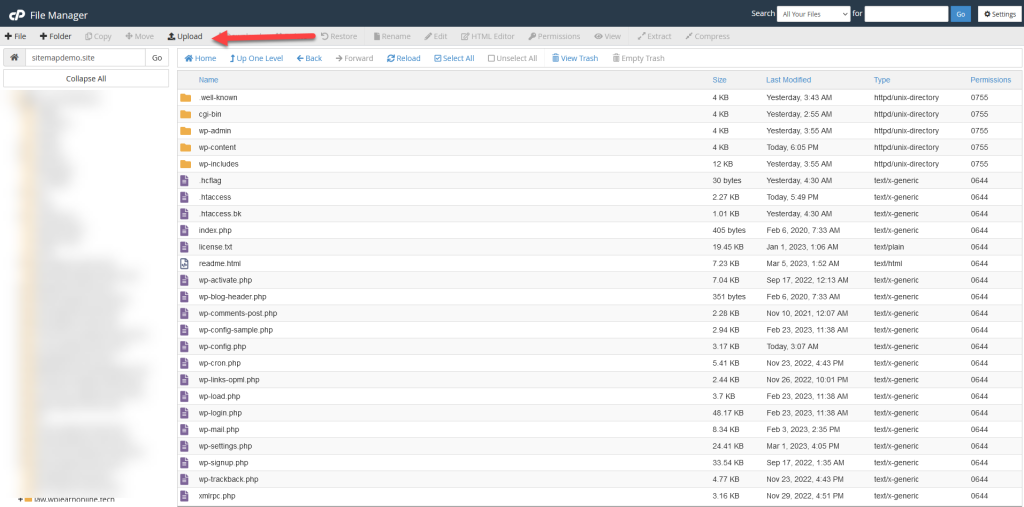
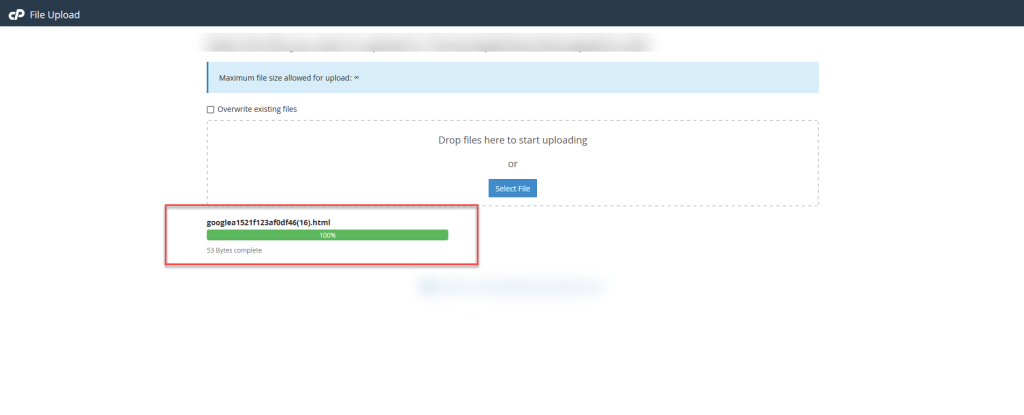
8. You should see a page similar to the one below, all you have to do is drag and drop the file you just download or click on “select file” to choose where the file is on your PC. You should see an image like the one below if your file upload was successful.
9. Once you have successfully uploaded the file, you can head back to the Google Search Console and click on the “Verify” button as shown in the image below
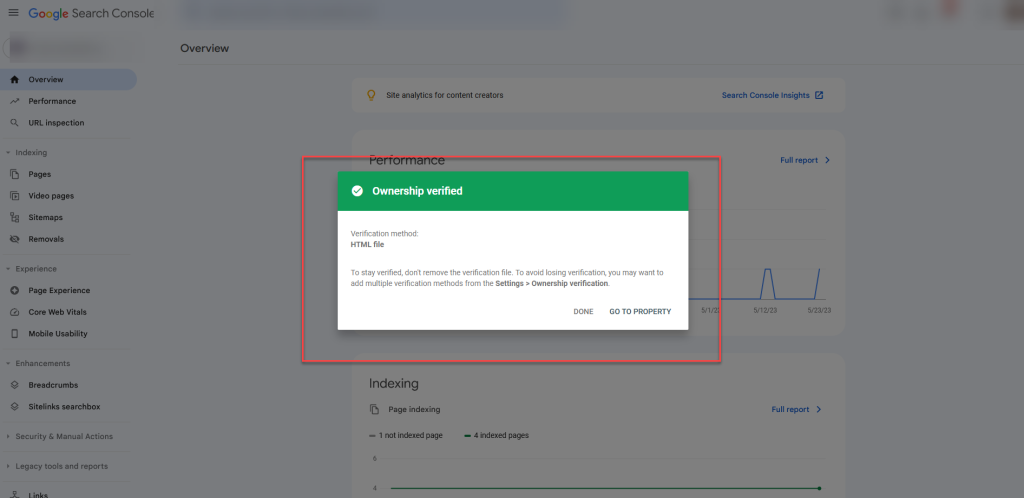
10. Once you hit the verify button, wait some minutes and you should see a popup similar to the one in the image below that says “Ownership Verified”. Click on the “GO TO PROPERTY” option to open up the dashboard for your newly added site.
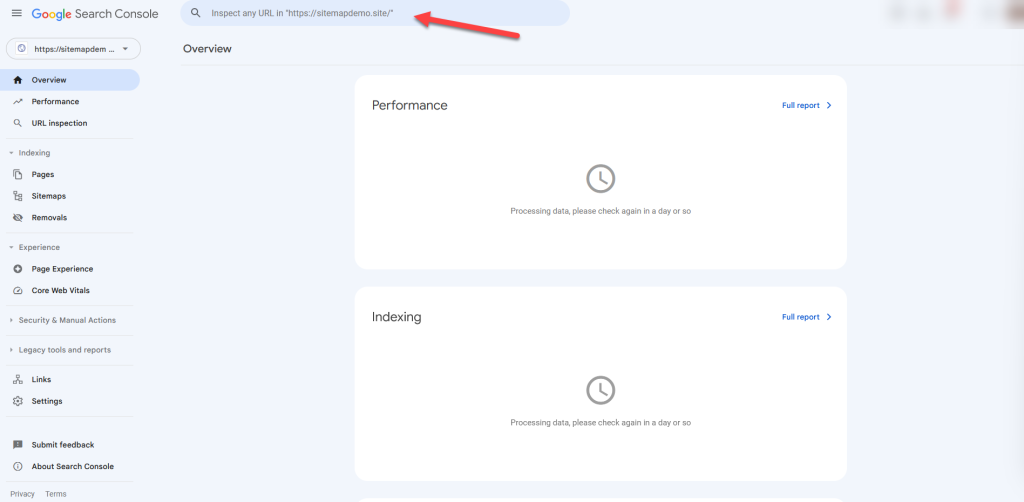
11. You should see a dashboard like the one in the image below.
Submitting Your Website’s Sitemap to Google Console
One of the things you can do on the Google search console is to submit your website’s sitemap. A sitemap is a file that lists all the pages of your website and provides valuable information about its organization and structure. It is typically in XML format and is used to help search engines like Google understand and crawl a website more efficiently.
Submitting it ensures that Google has information about your site and is able to crawl it so that it can be indexed.
Let’s add our website’s sitemap to the Google Search Console.
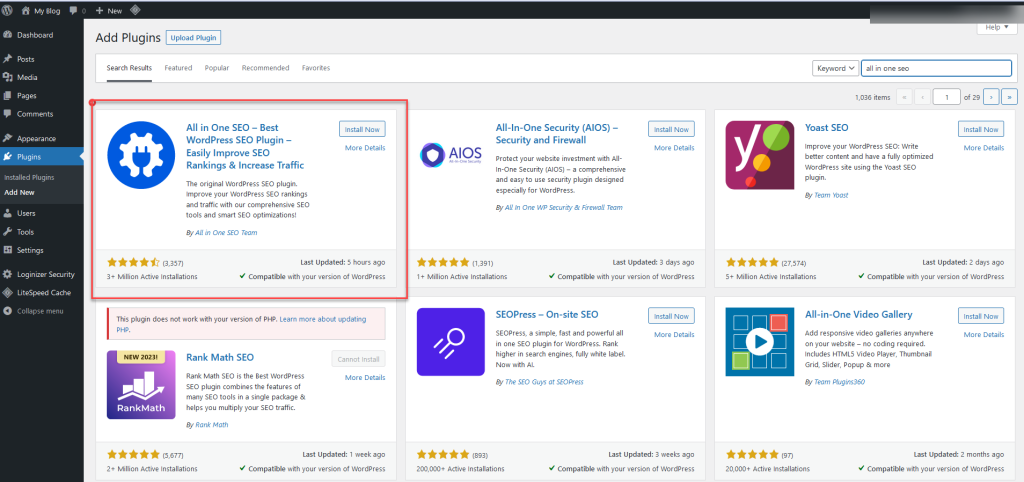
1. The first thing you want to do is install an SEO plugin. WordPress has a lot of free plugins for SEO that can help you easily generate your site’s sitemap, we will be using All-in-one SEO. You can go to the plugins page on your WordPress dashboard, click on add new, and search for the All-in-one SEO plugin in the WordPress plugin repository. Once you find it, install and activate it.
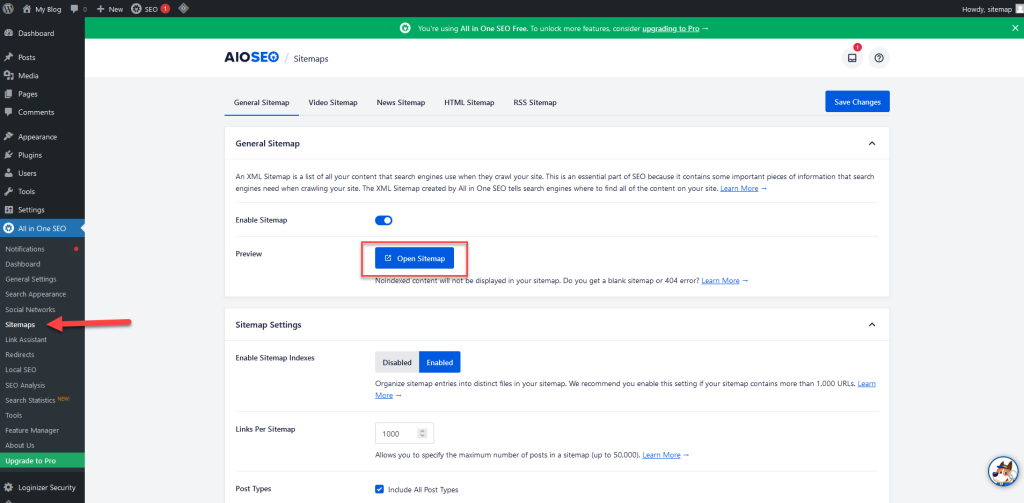
2. After successfully installing it, you can look for the All-in-one SEO menu on the dashboard and click on sitemaps. This will take you to a page as shown in the image below. You can click on the “open sitemap” button to reveal your sitemap on a new page.
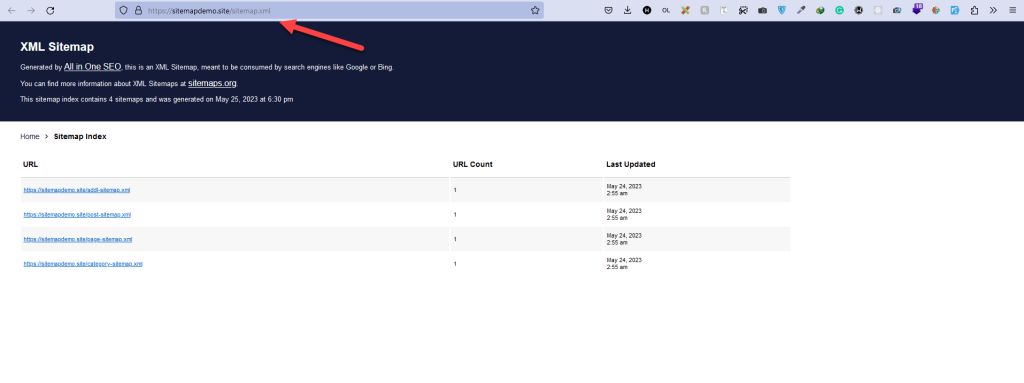
3. After clicking the “open sitemap” button, you should see a page like the one in the image below. All you need is the address of your sitemap.
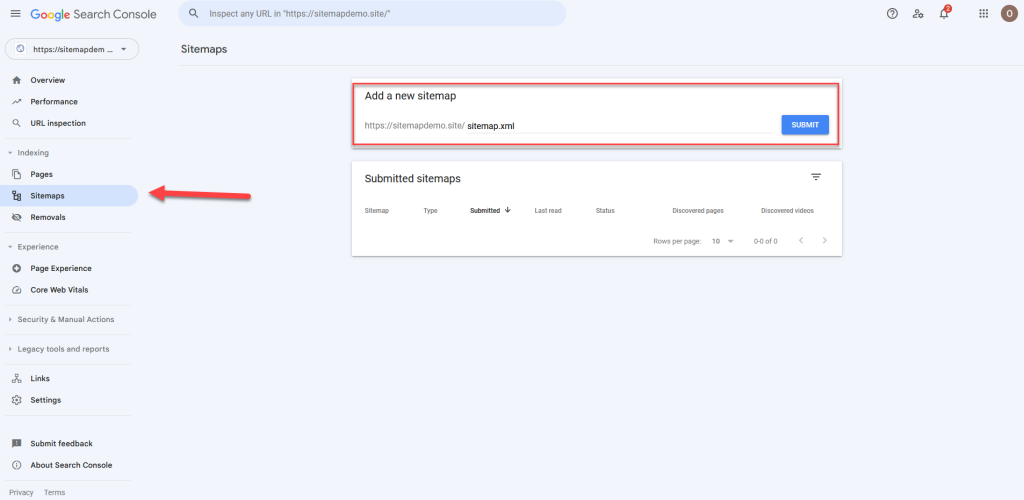
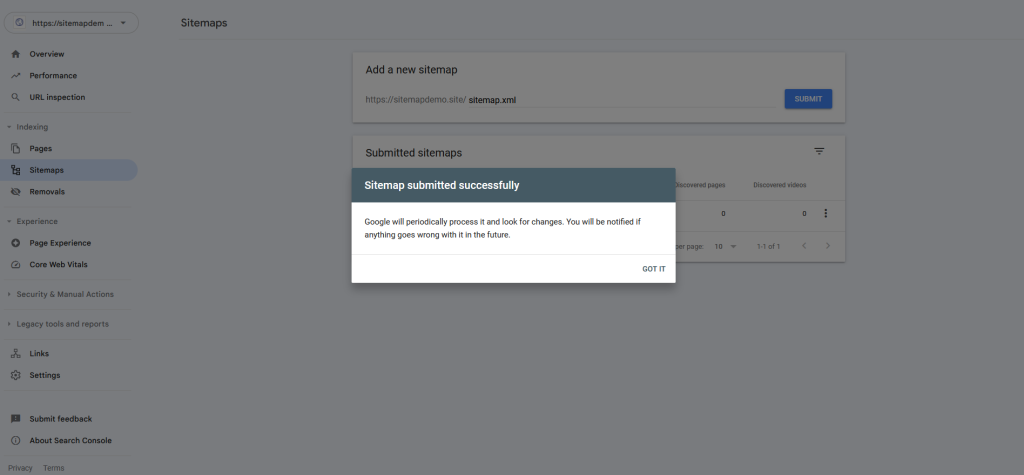
4. Head back to your Google Search Console, and click on “Sitemaps” on the left-hand panel. You will be required to add the URL to your sitemap. Input the URL that was generated by the All-in-one SEO plugin, and click on submit.
5. You will get a popup that says “Sitemap submitted successfully” and that’s it. You have successfully added your website’s sitemap to the Google Search Console
Conclusion
In this article, we have looked at how to add your WordPress website to Google Search Console and how to submit your website’s sitemap to Google Search Console. Adding your website to Google Search Console gives you essential insights, tools, and notifications to optimize your website’s performance in search results. Remember to explore the various features and tools provided by Google Search Console as this will equip you with valuable data to help you make informed decisions about enhancing your website’s presence and driving more organic traffic to your website.


